Why Your Shabby Chic Digital Paper Projects Fall Short (And How to Fix It)
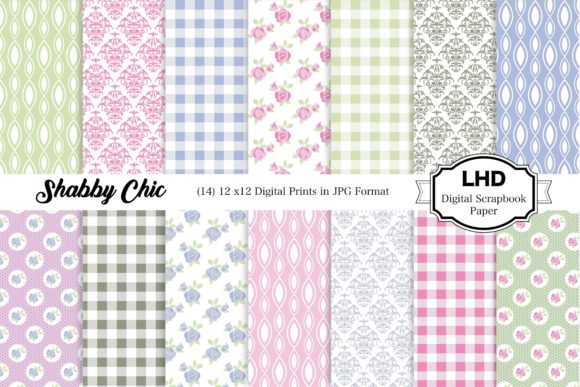
You have seen the soft roses, the muted damask patterns, and the gentle colour palettes that define shabby chic style. Whether you are crafting wedding invitations, designing a blog background, or wrapping a gift for a cottage-themed event, shabby chic digital paper offers a romantic, nostalgic foundation. Yet after downloading a pack—perhaps one with fourteen 12x12 inch JPGs at 300 dpi—you might find your final result looks flat, muddy, or just not as charming as you imagined. The paper itself is not the problem. How you choose, combine, and apply it often is.
This article walks through the most common mistakes people make when working with shabby chic digital paper—especially floral, damask, and rose patterns in green, blue, and pink—and shows you how to avoid them. By the end, you will know exactly what to check before you buy, how to use your digital paper pack effectively, and why small adjustments can transform your projects from amateur to polished.
Mistake 1: Choosing the Wrong Pattern Density for Your Purpose
Shabby chic digital paper packs often include a mix of dense floral repeats, all-over damask motifs, and subtle tonal textures. Many people assume that if one pattern is lovely, more patterns layered together will be even better. That assumption leads to busy, overwhelming designs where no single element stands out.
Why this hurts your project: A background that competes with your text or focal image reduces readability and professionalism. For invitations or announcements, the message gets lost. For blog headers or social media graphics, the visual hierarchy collapses.
How to avoid it: Before you open your design software, decide whether your digital paper will serve as a background, an accent, or a border element. A dense rose-and-damask pattern works beautifully as a full-page background only if you keep overlays minimal and text large in a neutral colour. For smaller projects like gift tags or card fronts, choose a paper with more negative space—perhaps a soft pink tonal or a green textured damask—so your central element breathes. If you are using a multi-paper pack, pick one dominant pattern and use others as subtle accents, not equal competitors.
Mistake 2: Ignoring the Scale of the Design
A 12x12 inch digital paper at 300 dpi gives you ample resolution, but the scale of the pattern itself matters just as much. A large floral motif that looks graceful on a full sheet may overwhelm a small card. Conversely, a tiny damask repeat that looks delicate at full size can feel busy and indistinct when cropped tightly.
Why this affects your results: When you cut, fold, or resize your printed paper, the pattern scale shifts. What looks balanced in the preview can feel disproportionate in the final product. This mismatch often leads to wasted paper, frustrated re-prints, or a rushed adjustment that compromises quality.
How to avoid it: Always test your chosen digital paper at the intended output size before committing to a full print run. Most design software allows you to preview at actual size or simulate the crop. For the shabby chic floral pack described earlier—with roses, damask patterns, and cottage-style backgrounds—use the largest motifs for full-page backgrounds and the smaller, more uniform patterns for smaller items like gift tags or envelope liners. Keep a mental rule: the smaller the finished piece, the simpler and more evenly distributed the pattern should be.
Mistake 3: Overlooking Colour Harmony Across the Pack
A well-curated shabby chic digital paper pack typically includes coordinated colours—green, blue, and pink in soft, muted shades. Yet even within a cohesive set, individual papers can vary in undertone. A pink rose paper might lean warm peach, while a green damask might have a cool sage base. When you combine them in a single project without checking, the result can feel disjointed.
Why this is more common than you think: Digital screens display colours differently from printed output. The paper that looked perfectly matched on your monitor may shift when printed on matte or glossy stock. Additionally, many designers work with multiple packs or sources, mixing papers that were not originally designed together.
How to avoid it: Before you build a project, print a small swatch of each digital paper you plan to use. Lay them side by side under natural light. If you see warm-cool conflicts, adjust with a unified overlay—a soft white or pale cream layer at low opacity can harmonise disparate undertones. For the romantic cottage papers mentioned, stick to one colour family per project: all pink-and-cream for a Valentine card, all blue-and-sage for a baby shower invitation, all green-and-ivory for a garden party. Consistency elevates even the simplest design.
Mistake 4: Misunderstanding Resolution and Print Quality
The product detail says "300 dpi" and "12 x 12 inches." Many people take that at face value and assume it guarantees sharp printing. But resolution is only one part of the equation. The actual pixel dimensions matter, and so does the paper's pattern detail. A 300 dpi file that was heavily compressed or poorly exported can lose fine details—especially important for delicate damask lines and rose petal textures.
Why this undermines quality: Shabby chic style relies on subtle details: the faint veins in a rose, the gentle curve of a damask scroll, the soft grain of a vintage background. When those details blur or pixelate, the romantic effect fades into something that looks cheap and rushed.
How to avoid it: When you download your digital paper pack, check the actual pixel dimensions. A true 300 dpi 12x12 inch file should be 3600 x 3600 pixels. Open a couple of the JPGs in your editing software and zoom to 100% to confirm that the pattern details hold. Avoid scaling the paper up beyond its native size; if you need a larger print, consider whether the pattern can tile seamlessly. For the 14-paper pack described, each JPG at 3600 x 3600 pixels gives you excellent quality for standard projects. Use those files directly rather than resizing them unnecessarily.
Mistake 5: Using Digital Paper as a Solo Act Without Texture or Depth
Shabby chic style is rooted in layers: lace over linen, paint over distressed wood, flowers over faded wallpaper. A single flat digital paper, no matter how beautiful, can feel sterile when printed and used on its own. Many beginners treat the paper as the complete design, missing the opportunity to build the depth that gives shabby chic its lived-in charm.
Why this limits your creative potential: A romantic cottage aesthetic depends on visual and tactile richness. Flat, unlayered digital paper can look like generic clip-art rather than a thoughtfully crafted background. The difference between a so-so project and a stunning one often comes down to what you add on top or underneath.
How to avoid it: Treat your digital paper as one layer in a stack. Add subtle textures—a soft grunge overlay, a faint linen effect, a gentle vignette—to give the paper physical presence. When using the floral and damask papers from the pack, consider printing on textured cardstock or adding a light distressing technique to the edges. For digital projects, layer a semi-transparent white or cream shape between your background and your text; this creates the illusion of a vellum overlay, a classic shabby chic element. Even a faint shadow or stitching line can separate your work from a simple image. The goal is richness without clutter.
Mistake 6: Forgetting the End Use When You Select Papers
It is easy to fall in love with a paper pack based on its preview images. The romantic roses, the soft green damask, the cottage-style florals—they all look inviting. Yet those papers may not suit every application. A high-density pattern that looks stunning as a digital background can overwhelm a small physical object like a candle wrap or a favour box. A very light paper may not provide enough contrast for text without additional backdrops.
How this affects your satisfaction: When your finished project does not match your mental vision, disappointment follows. You might blame the paper pack, but the real issue is a mismatch between the paper's characteristics and your project's needs.
How to avoid it: Define your project before you open the paper files. For printed invitations, test your paper with the text size and font you plan to use. If the pattern competes with the words, choose a simpler paper from the pack or add a solid panel behind the text. For wrapping paper, consider how the pattern will align when folded around a box—large motifs may need careful placement to avoid awkward cuts. For digital backgrounds, test the paper against your content to ensure contrast and readability. A little forethought saves time, paper, and frustration.
Mistake 7: Neglecting File Format and Compatibility
The pack provides 14 JPG files at 300 dpi. JPG is widely compatible, which is convenient. But JPG uses lossy compression, and repeated saves can degrade quality, especially in areas of subtle colour gradient like soft pink roses or faded green damask. Some designers overlook this and re-save files multiple times for different projects, gradually losing the fine detail that makes shabby chic paper beautiful.
Why this matters over time: If you archive a degraded file and reuse it months later, you may not notice the gradual loss of quality until you compare it with the original. By then, you might no longer have the original download available.
How to avoid it: Keep your downloaded JPG files as a master archive and never overwrite them. When you need a version for a specific project, duplicate the file and work on the copy. Save your finished project files in a lossless format like PNG or TIFF if your workflow allows. For the best results, avoid re-compressing JPGs unnecessarily. If you edit a paper—adjusting colour, adding texture, or cropping—save the edited version as a new file with a clear name that references the original. This habit preserves the integrity of your digital paper pack for years.
Putting It All Together: Your Next Steps
Working with shabby chic digital paper should be a pleasure, not a puzzle. The romantic cottage aesthetic—with its roses, damask patterns, and soft green, blue, and pink palettes—can elevate your projects when you choose and apply it thoughtfully. Start by evaluating pattern density and scale for your specific usage. Check colour harmony across the pack and test your selections at actual size. Respect the resolution of your 300 dpi files and avoid degrading them through repeated compression. Build layers and texture to give your designs depth, and always match your paper choice to your project's requirements.
The next time you open that pack of fourteen 12x12 inch digital papers, you will see not just beautiful patterns, but a toolkit of creative possibilities. With the right approach, every rose, every damask scroll, every vintage background can work exactly as you envision.